Chestnut financiers

Chestnuts are so underrated, and they shouldn’t be because they are delicious! Boiled, roasted or candied, chestnuts taste amazing, with their soft, creamy and delicate texture. If you want to make me happy over the holidays (or any time, really), get me a box of candied chestnuts! They are to die for!

I’ve been wanting to make a dessert out of chestnut spreads for some time now, but never really got to it. Last year, I made all these plans for a homemade Mont-Blanc. Spent weeks researching for the perfect recipe, planning, buying all the right ingredients, and everything. In the end, I got lazy and my plans went nowhere…

This year, I stumbled on a few cans of chestnut spread while grocery shopping and took it as a sign that I should pull through, this time. Not with the Mont-Blanc, though. That’s way too time consuming. I wanted to bake something simple but tasty. My personnal favorite snacks are financiers, so I decided to give chestnut financiers a try, to see what they taste like. I must say, the result is more than satisfactory! It also helps that this cake is beyond easy to prepare!

Chestnut financiers

Makes approx. 15

ingredients

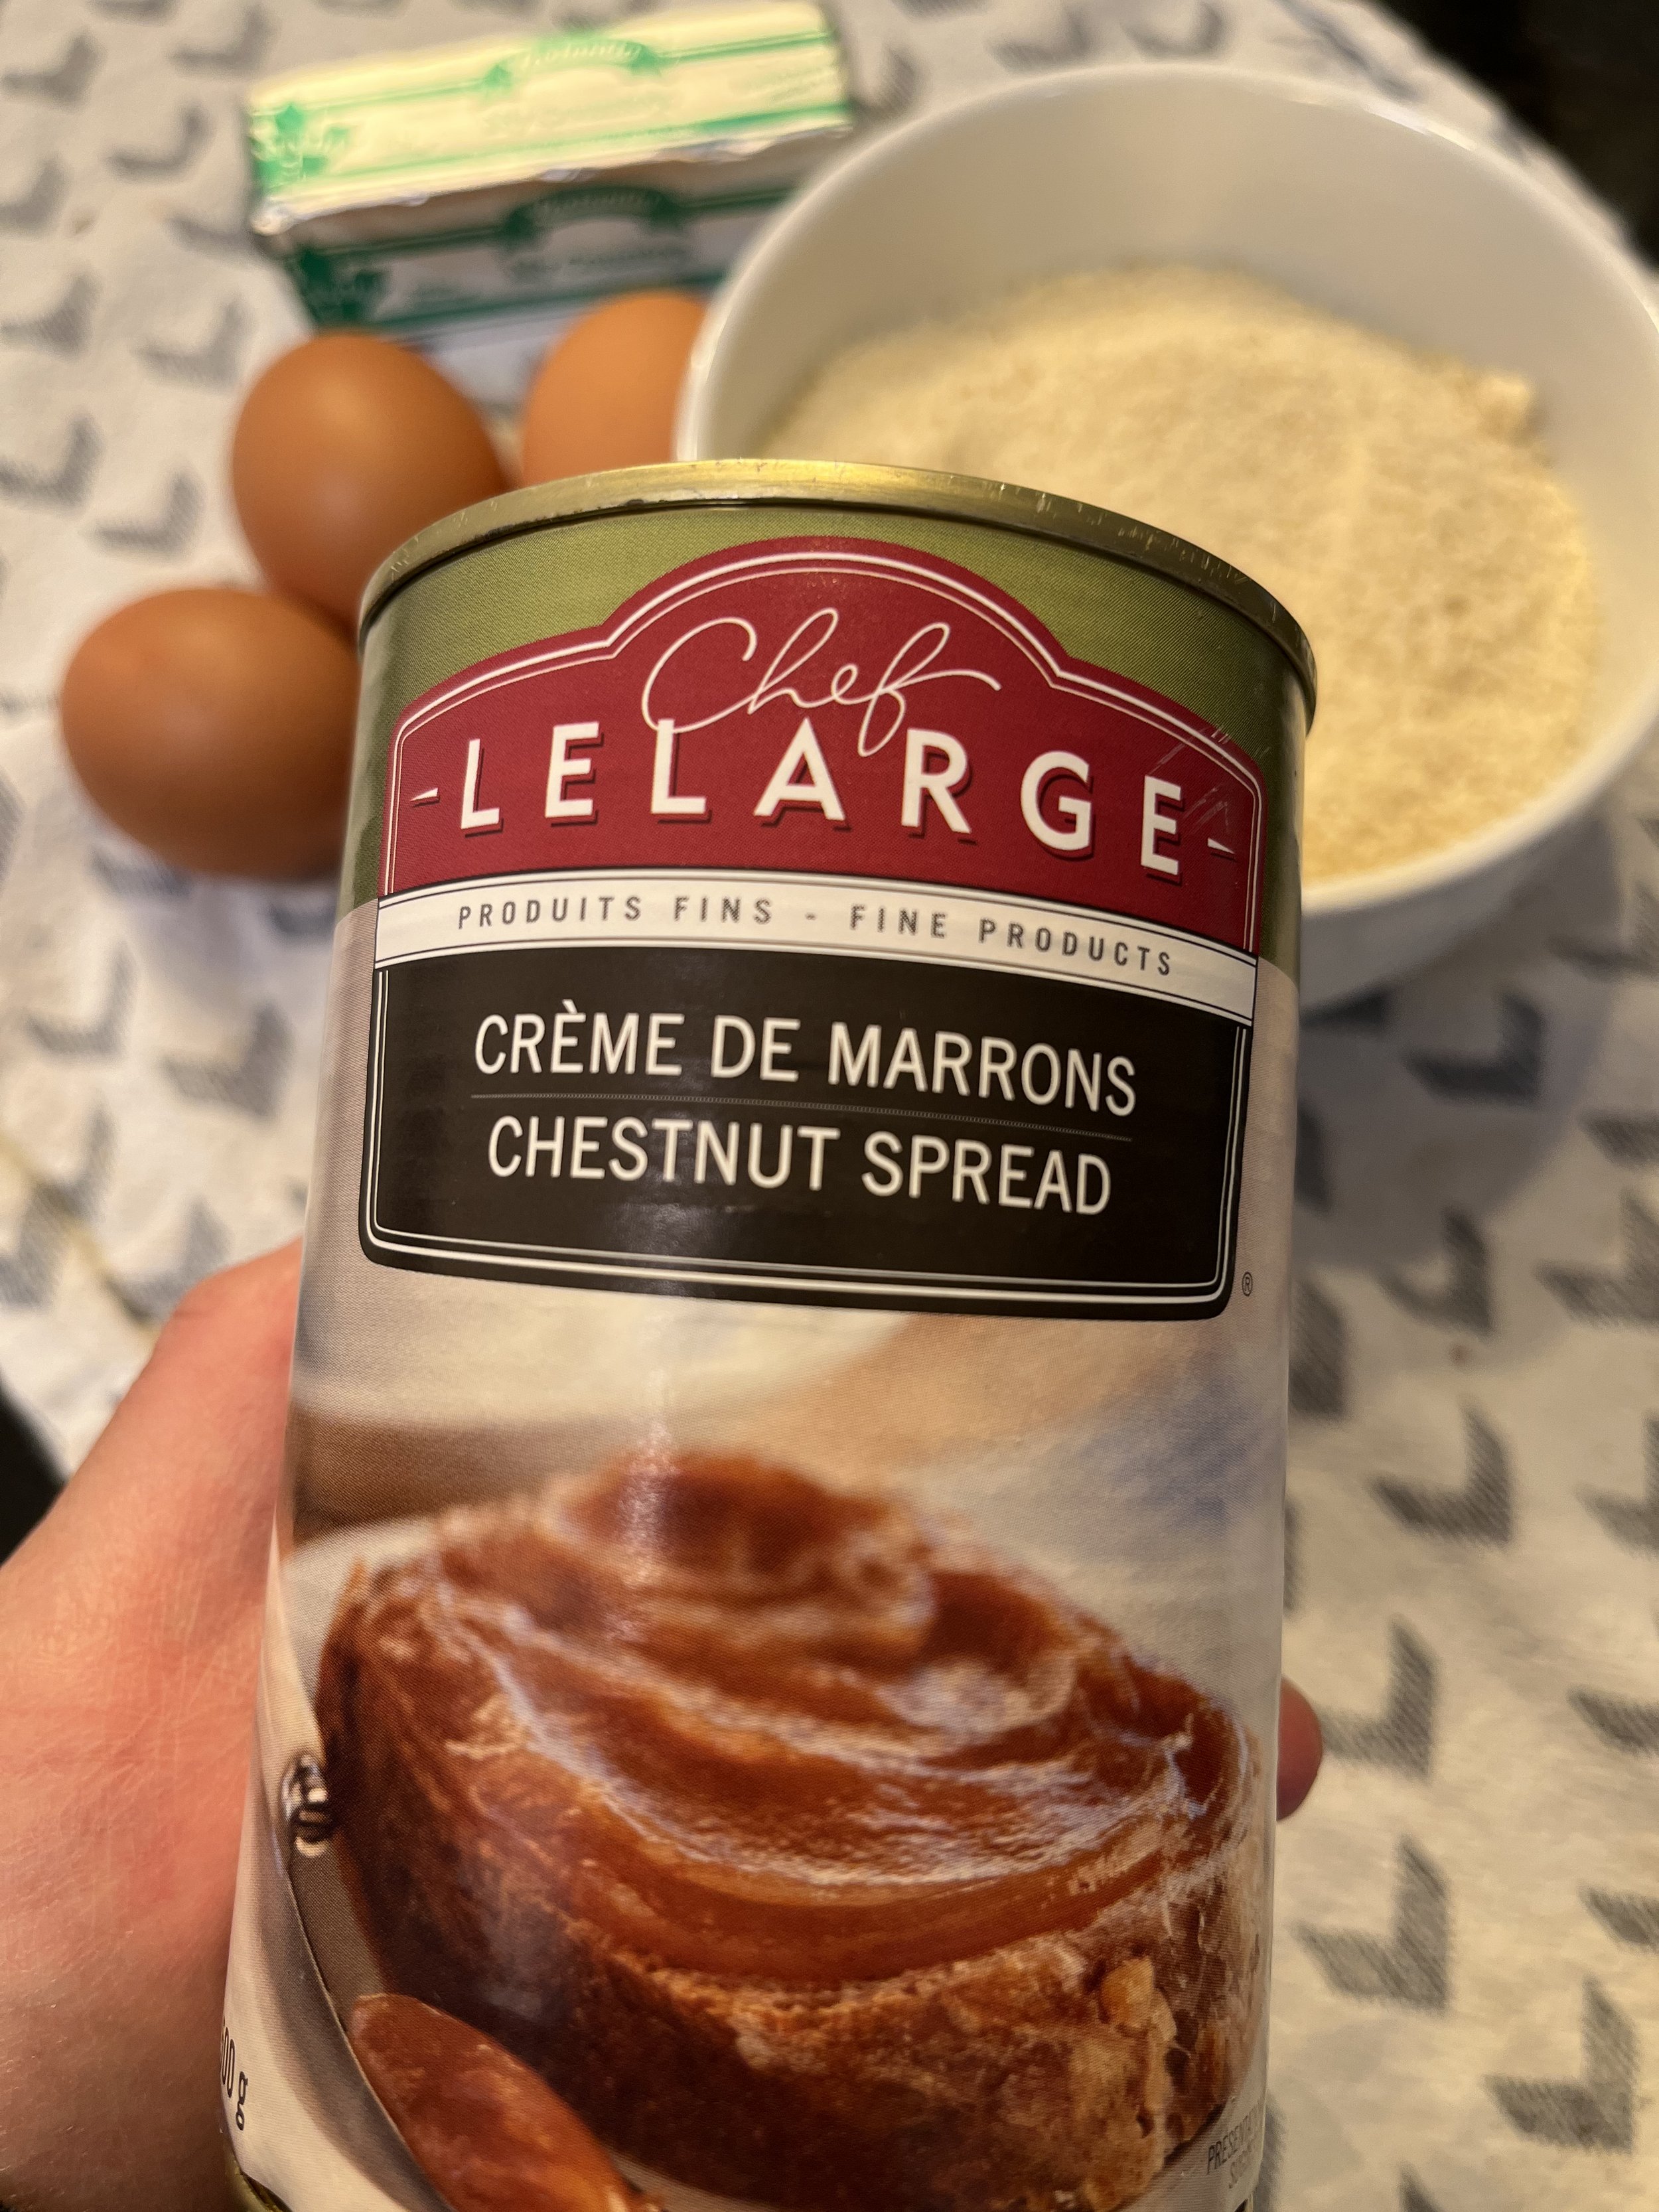
  • 2 cups ground almonds

  • 500gr chestnut spread (1 can)

  • 4 eggs

  • 6 tbsp butter

  • salt

directions

  1. Preheat oven at 320.

  2. Prepare muffin pan with liners.

  3. Melt the butter and set aside.

  4. Separate eggs yolks from the egg whites.

  5. In the bowl of an electric mixer fitted with the whisk attachment, beat the egg whites with a pinch of salt until stiff peaks form, and set aside.

  6. Still with the electric mixer, mix the egg yolks with the chestnut spread until combined.

  7. Add the butter, then the ground almond, mixing well after each addition.

  8. Incorporate the egg whites to the mixture, and mix delicately with a spatula.

  9. Fill the muffin cases 2/3 full and bake for 30 to 35 minutes.

  10. Let the cakes rest in the tin for 5 minutes before transferring them to a rack to cool completely.

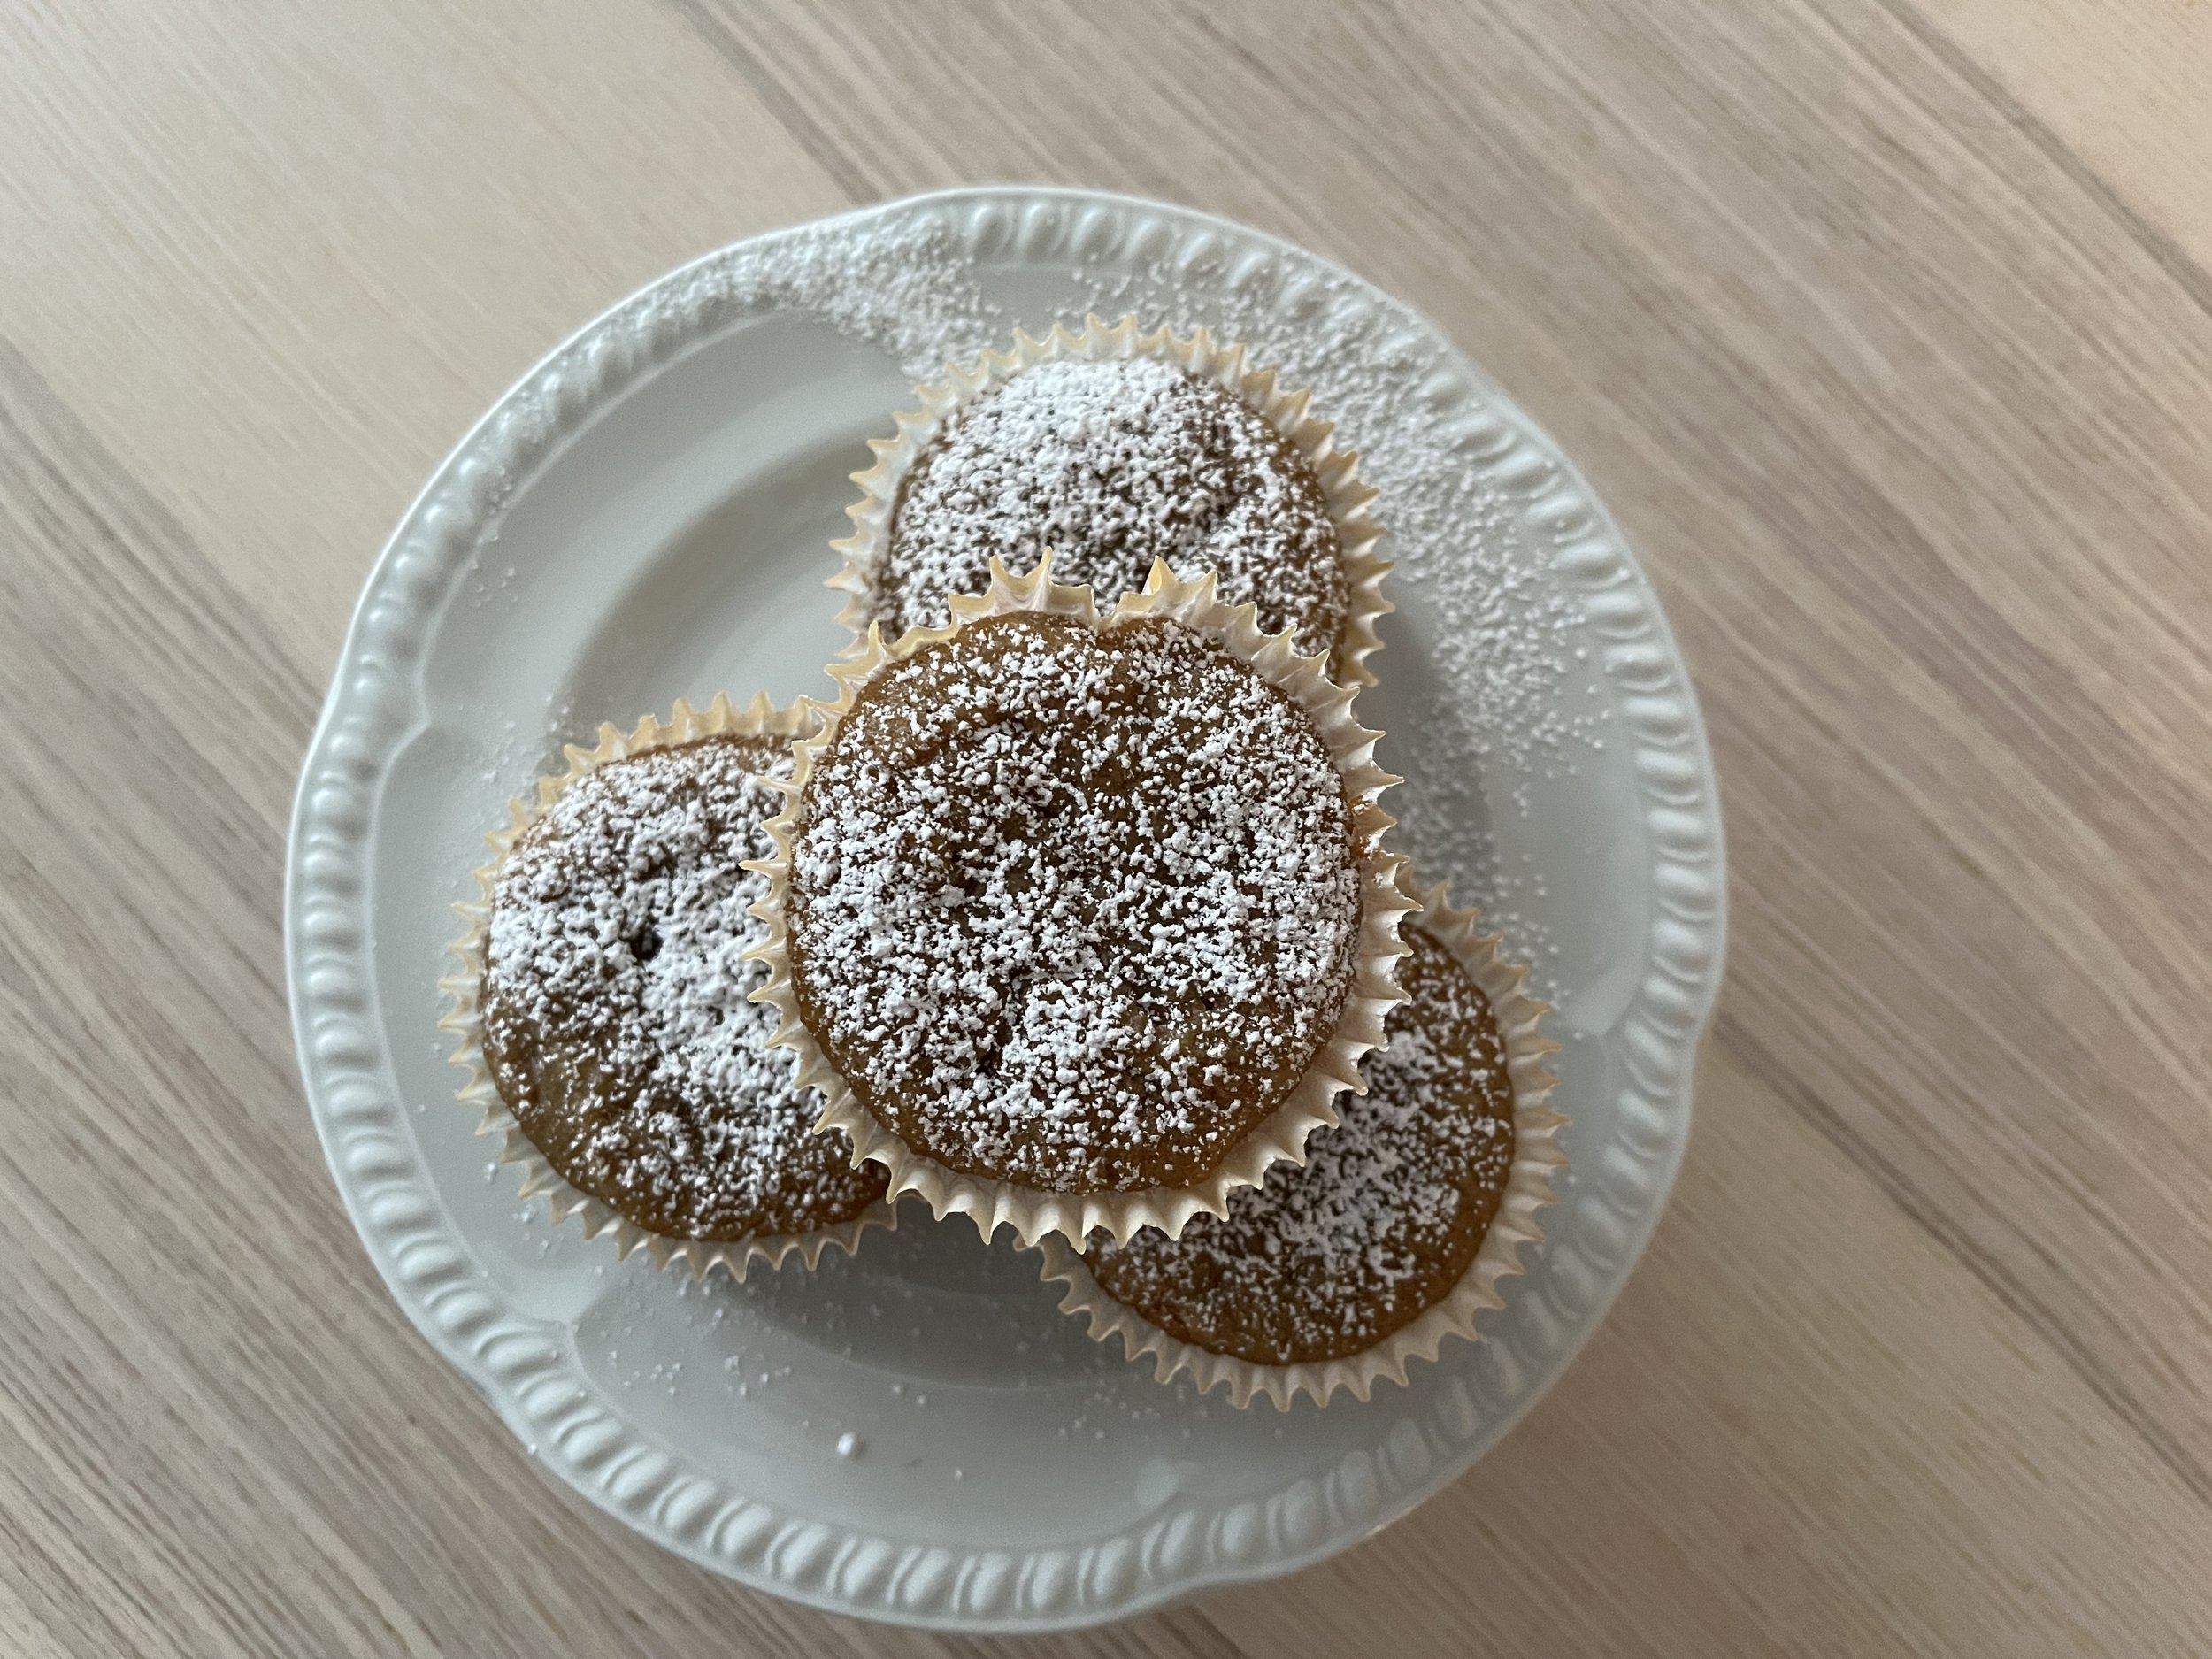
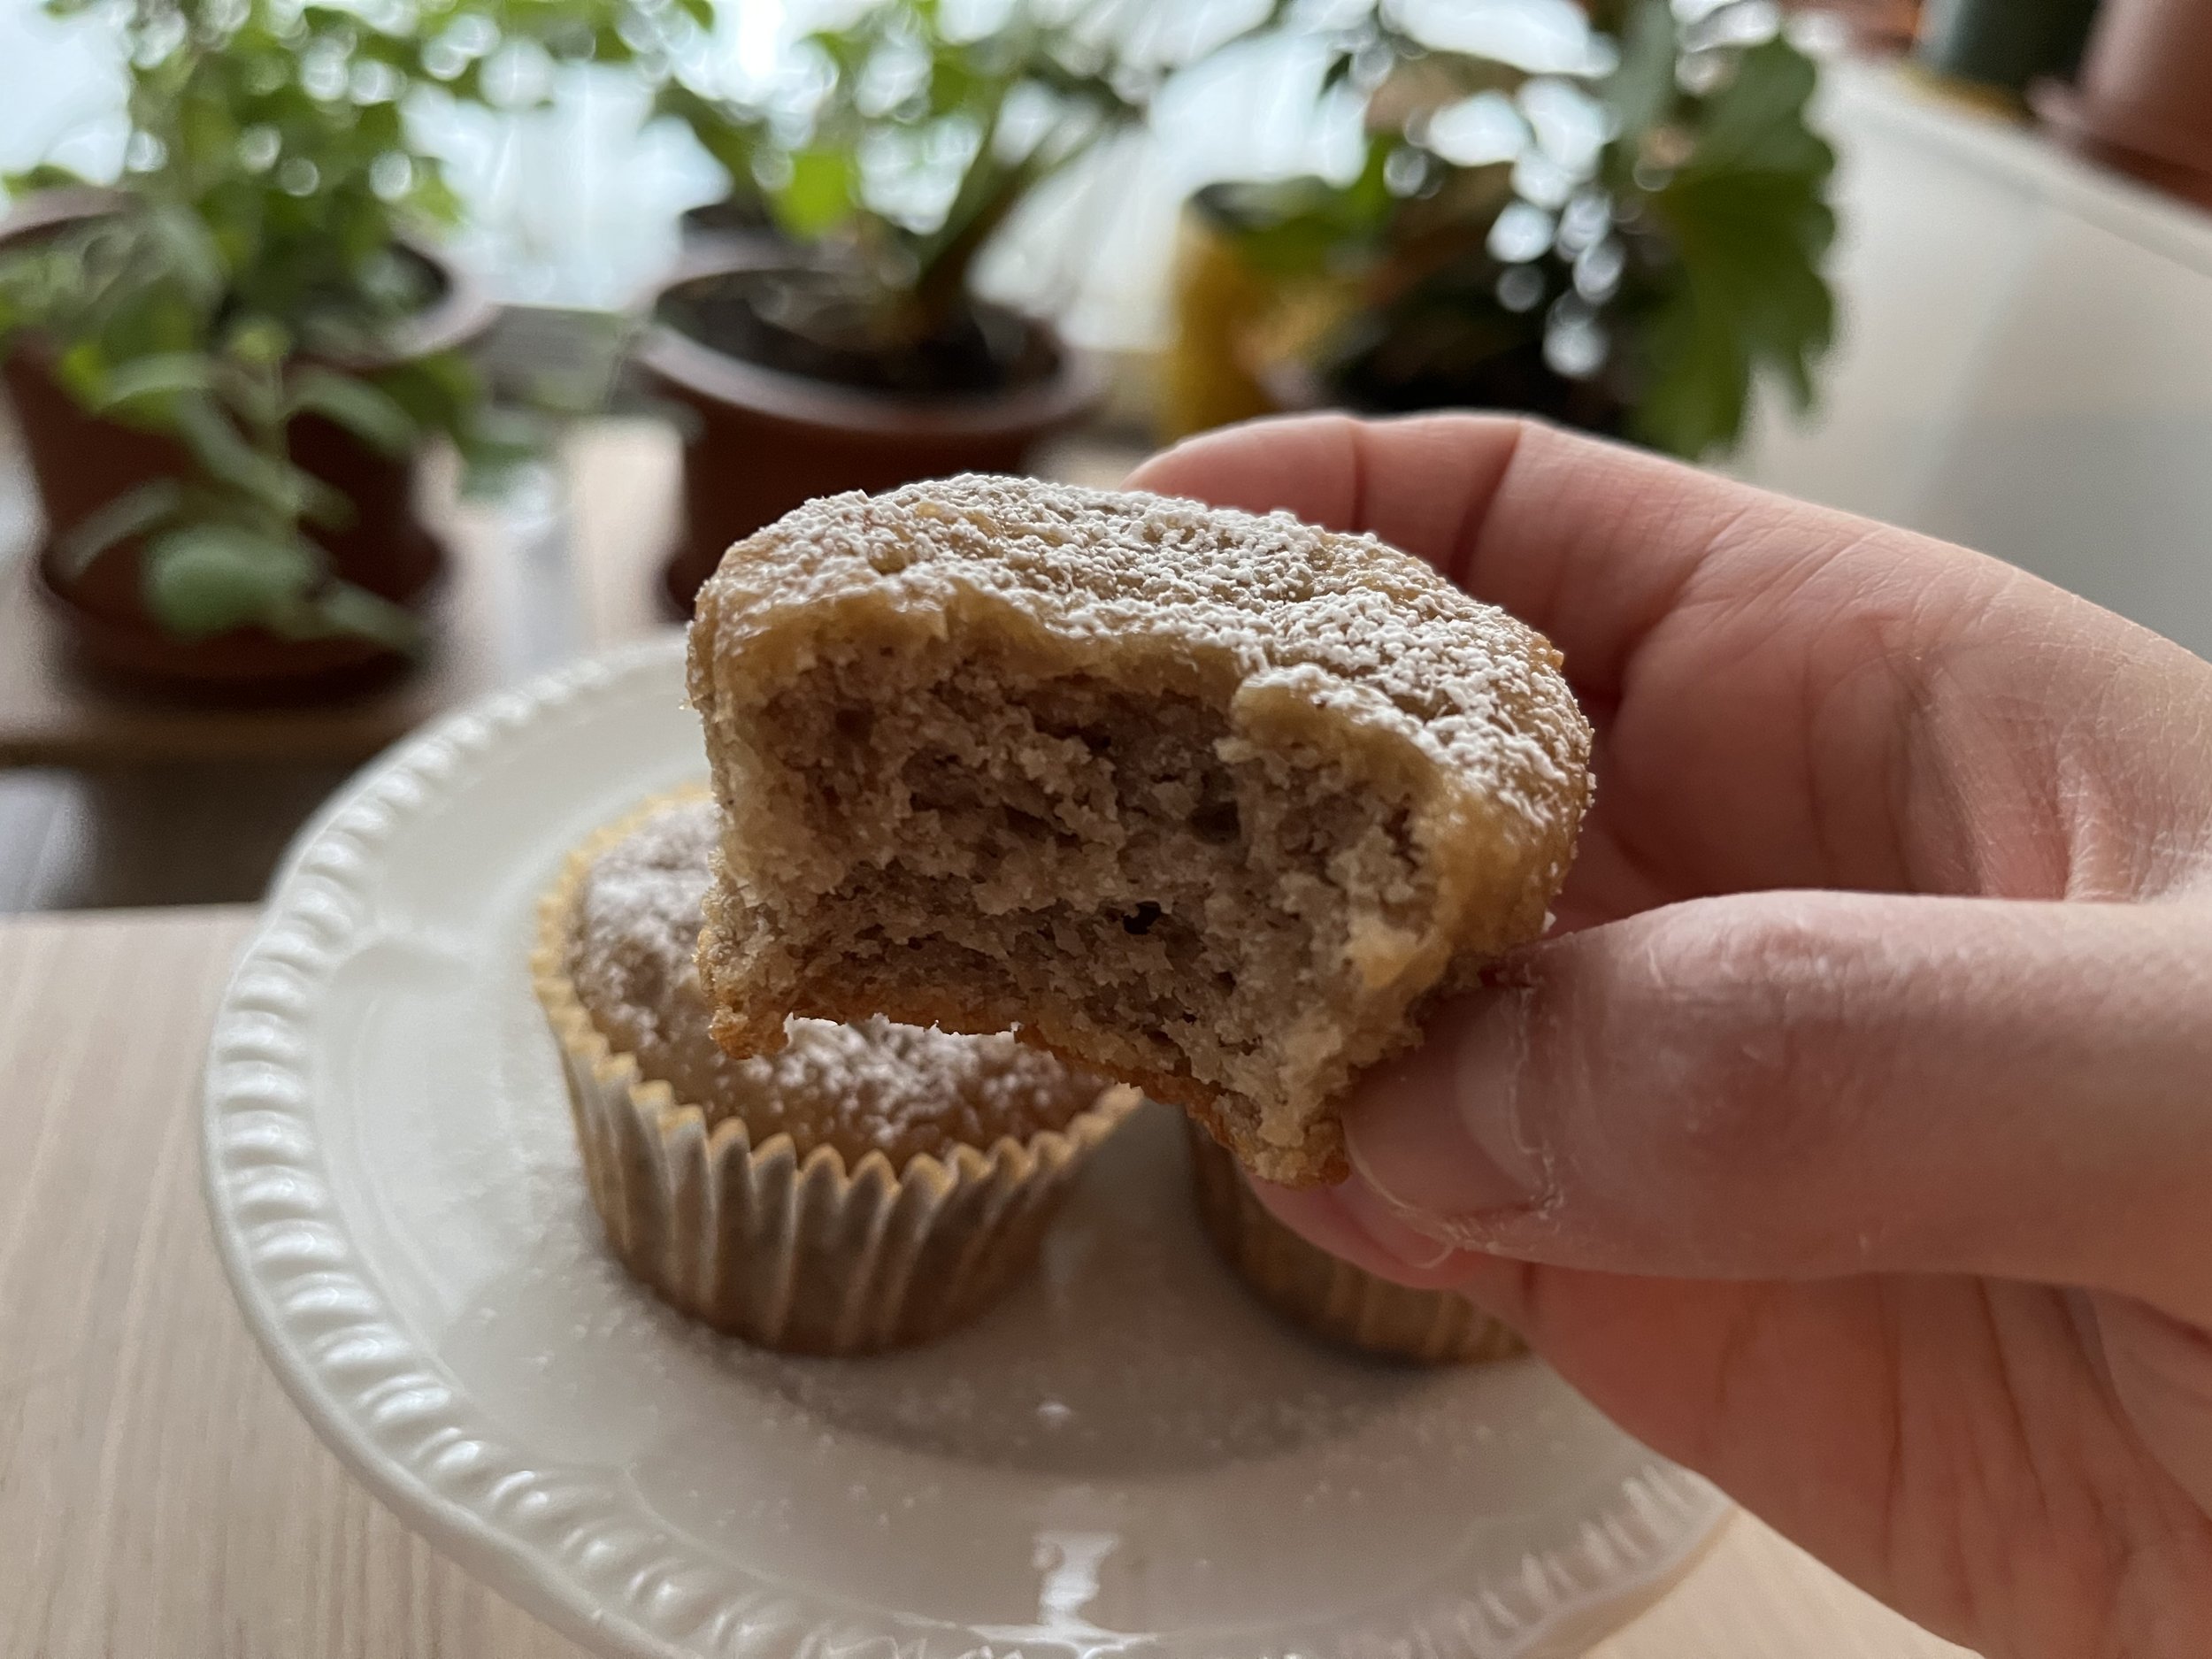
And that’s it! How simple was that? The cakes are moist, slightly crumbly, with a sweet but delicate chestnut taste. I dusted the cakes with some icing sugar only to make them pretty, but that’s what I like about financiers (aside from being super easy to make) : they don’t need icing or frosting.

Enjoy!

Lemons and Poppy Seeds

So I woke up this morning craving something sweet and lemony. Of course, the first thought that crossed my mind was poppy seeds. Why? Because lemons and poppy seeds, for some reason, make one hell of a team. I honestly cannot explain why I love this pairing so much. Is it the added texture that the poppy provides, or its subtle nutty flavor? I don’t know and I don’t plan on dwelling too much on the matter. Bottom line is, these two ingredients work together and help elevate each other.

Fortunately, I had everything I needed in my pantry so no need to change and go out. What is great here is that this recipe is really simple and doesn’t require too many ingredients (or too much effort for that matter!). I chose to make mini cakes because I love everything bite-size, and because baking time is reduced to only 15 minutes!

So is it a muffin or a cake that I’m making? Personally, I find that the only difference between cake and muffin is the presence of icing or frosting, or their lack thereof. If there’s icing or frosting, it’s a cupcake or a cake, depending on the size of your dessert. No icing or frosting means that it’s a muffin so you can eat it for breakfast without feeling judged. In this case, I used a thick lemony glaze. My point here is that you could use this recipe to make muffins or cakes, which is why I omitted mentioning either one of them in the title.

IMG_5643.jpg

Lemon/ poppy seed cakes

Makes 24 mini cakes or 6 muffin size cakes

ingredients

  • 1 1/4 cups flour

  • 1 tsp baking powder

  • 1/4 tsp salt

  • 2/3 cup sugar

  • 1 egg

  • 1/2 cup vegetable oil

  • 1/3 cup whole milk

  • 1 tsp vanilla

  • 1 tbsp poppy seeds

  • Lemon zest (2 lemons)

  • 1/2 sour cream

glaze (optional)

  • 1 1/2 cup powdered sugar

  • 1 1/2 tbsp whole milk

  • 1 1/2 tbsp lemon juice

  • 1 tsp poppy seeds

directions

  1. Preheat oven at 375 degrees.

  2. Place liners in muffin tin.

  3. In the bowl of an electric mixer fitted with the paddle attachment, mix sugar, egg, milk, oil and vanilla until well combined, about 2 minutes.

  4. Add poppy seeds and lemon zest. Continue mixing for a minute.

  5. In a separate bowl, sift together flour, baking powder and salt.

  6. Incorporate flour mixture into wet ingredients and fold with a spatula until everything is well combined.

  7. Add the sour cream and stir until incorporated.

  8. Spoon the batter evenly in the muffin tin.

  9. Bake for 15 minutes for mini cake, and 22 minutes for muffin size cakes, or until a toothpick inserted in the center comes out clean.

  10. Let the cakes rest in the tin for 5 minutes before transferring them to a rack to cool completely.

  11. While the cakes cool, prepare the glaze (optional).

  12. Mix all 4 ingredients (powdered sugar, poppy seeds, milk and lemon juice) in a bowl. Mix well until the mixture is no longer lumpy. Add more powdered sugar or liquid (lemon juice or milk) for the desired consistency.

  13. Pour a dollop of lemon glaze on cooled cakes.

The cakes are super moist, with a crunchy top which is the best! The lemon zest came through and each bite is full of flavor, while the poppy provides some added crunch. And, because I made mini cakes, they are bite=size and can be eaten like pop corn!!!

Variations

Instead of the glaze, you could also insert some lemon custard into the cakes. I opted for a glaze because I was feeling lazy, but the custard is definitely my preferred option.

If you’re not a fan of poppy seeds, you could make the same recipe with ground almonds. I personally find that lemon cakes taste better when there’s a contrasting nutty flavor that’s added. So mix together 1 cup of flour with 5 tbsp of ground almonds, and add 1/4 almond extract in the wet ingredients.

Also, the cakes are also packed with flavor so technically, they don’t really need anything else to improve their taste. You could eat them as they are and be completely satisfied. The up-side here is that if you choose to exclude any form of icing, frosting or custard, you could eat the cakes straight out of the oven!

Enjoy!


Raspberry / Almond / Pistachio Friands

I haven’t baked much lately. There was a series of heat waves during summer, so I avoided turning my oven on at all cost, and then fall came and we took some time off to go on a much deserved vacation to Oahu. After we came back, it took us a while to get back into our regular routine…

However, the holidays are just around the corner and I am feeling energized again! I stumbled on Claire Ptak’s lovely friand recipe in her beautiful book The Violet Bakery Cookbook and had to try it right away. I love friands. They are packed with an intoxicating almond flavor and they are just so moist and delicious, not to forget, pretty easy to make!

If you are pressed for time during the holidays and need to impress with a dessert, these cakes are your solution: they are super tasty, easy and quick to make and the pistachio/raspberry green/red color combo couldn’t be any more christmas-y! Sprinkle a little powdered sugar on top and you’ve hit gold!

I had to adapt the recipe a little bit because I did not have everything on hand, and I did not exactly follow her exact instructions. Bellow is the recipe I made, but for Claire Ptak’s original recipe, check out her book!

IMG_0793.JPG

Raspberry / Almond / Pistachio Friands

Makes approx. 10 muffin size cakes

INGREDIENTS

  • 1/2 cup butter, melted, plus more to grease the mold

  • 5 egg whites

  • 1 tsp vanilla extract

  • 1/4 tsp almond extract

  • 2/3 cup all-purpose flour

  • 3/4 tsp baking powder

  • 1 cup ground almond

  • 1/2 cup ground pistachios

  • 1 cup powdered sugar, plus more to sprinkle the cakes

  • About 30 fresh raspberries

  • 3/4 cup slivered pistachios

DIRECTIONS

  1. Preheat oven at 320 degrees.

  2. Grease the mold of your choice. In this case, I used a regular muffin tin.

  3. Using In the bowl of an electric mixer fitted with the whisk attachment, beat the egg whites until light and fluffy.

  4. Switch to a paddle attachment and add the wet ingredients (melted butter, vanilla and almond extracts). Mix at medium speed until incorporated, about 1 minute.

  5. Add the dry ingredients (flour, baking powder, ground almond and ground pistachio) and mix until incorporated, about 1 or 2 minutes.

  6. Fill the muffin molds about 2/3 full with the batter.

  7. Insert 2 or 3 raspberries into each mold. Be careful not to break the raspberries!

  8. Sprinkle with slivered pistachios. Push them down a bit into the batter so they don’t fall out when the cakes rise.

  9. Bake for 17 to 20 minutes.

  10. Let the cakes rest in the tin for 5 minutes before transferring them to a rack to cool completely.

  11. Sprinkle the cake with some powdered sugar.

That’s it! How easy was that?

IMG_0784.JPG

Don’t like pistachios or raspberries? That’s fine! You can simply replace them with whatever you like: chocolate chips, another fruit like cranberries, nectarines, apple or pear, or another nut like hazelnut. Once you get the base of the recipe, you can pretty much adapt to your taste.

In this case, I find the colors of the cake very festive without being tacky. It’s simple, elegant and delicious!

Enjoy!

The best carrot cake

A good carrot cake is very difficult to come by. Especially if you, like me, don't like cinnamon. I am not a fan of spices in general and never found the need to add them to my desserts. Personally, I find their taste a bit too strong and overwhelming, and that is why I tend to avoid using them when baking. The problem is, most carrot cake recipes require some amount of cinnamon, spices or raisins. Raisins. That's another thing I dislike. So, although I do love a good carrot cake, I seldom find one I actually enjoy or a recipe for one that doesn't require raisins and cinnamon or some other spice.

IMG_4959.JPG

This recipe is my all-time favorite because it requires none of the ingredients I dislike and it tastes wonderful! I rarely make carrot cakes, though, because the amount of dishes I have to wash afterwards is depressing. So, I save this cake for special occasions and make it only once or twice a year. This year, I baked a batch over the Easter break.

IMG_4943.jpg

If you are not a fan of cinnamon, spices and raisins but love carrot cake, this recipe is definitely for you. 

IMG_4962.jpg

The best carrot cake

Makes 24 muffin size cakes

Ingredients

  • 2 1/2 cups flour

  • 1 1/2 tsp baking soda

  • 1 1/4 tsp baking powder

  • 1/2 tsp salt

  • 1 1/2 cups sugar

  • 4 large eggs, room temperature

  • 1 cup vegetable oil

  • 1 tsp vanilla extract

  • 2 cups grated carrots (approx. 4 carrots)

  • 1 cup chopped pecans

  • 1 cup unsweetened shredded coconut

  • 1 8oz can of crushed pineapple (drained)

  • Vanilla frosting

Directions

  1. Preheat oven to 350 degrees.

  2. Line 2 muffin tins with paper liners.

  3. Sift together flour, baking soda, baking powder and salt.

  4. In the bowl of an electric mixer fitted with the paddle attachment, mix sugar, eggs, oil and vanilla at medium speed until light colored and well combined. 3 to 4 minutes.

  5. Slowly add the flour mixture and mix until just blended.

  6. Fold the carrots into the mixture. This step and the next ones are delicate, so hand mix with a spatula.

  7. Fold the pecans into the mixture.

  8. Do the same for the coconut, and then the pineapple.

  9. Fill each liners about 2/3 full with the batter.

  10. Bake for 20 minutes or until a toothpick inserted in the center comes out clean.

  11. Let the cakes rest in the tin for 5 minutes before transferring them to a rack to cool completely.

For me, carrot cake comes with a good layer of frosting. Cream-cheese frosting to be precise. If there are none, I would get seriously upset. If you're looking for a good cream cheese frosting recipe, click here. It also happens to be my go-to vanilla frosting for any type of desserts.

Optional

If you want to impress people, decorate your carrot cakes with little curls of candied carrots. They look fancy but are super easy to make. There seems to be a lot of steps, below, but rest assured that the curls really are easy to make!

  1. Preheat oven to 225 degrees.

  2. Make carrot strips using a vegetable peeler. Only 1 carrot will be needed.

  3. Bring 1 cup of water and 1 cup of sugar to a boil, on high heat, and mix until all the sugar has dissolved.

  4. Add the carrot strips and reduce heat.

  5. Let simmer for about 15 minutes.

  6. Remove from heat an strain out the liquid. Let cool a few minutes.

  7. Put parchment paper on a large baking sheet and spread the carrot strips on a single layer.

  8. Bake for about 20 minutes, but do not turn off the oven.

  9. The strips will be almost dry.

  10. Working very quickly, wrap each carrot strips around a pencil to form curls and gently slide the curls off the pencil.

  11. Put the curls back in the oven and continue baking for about 10-15 minutes, until completely dry.

  12. Let the curls cool completely before decorating the cakes with them.

Variation

If you don't want to make cupcake size cakes and prefer a bigger one, just use 2 9-inch round pans. Line their bottom with parchment paper, and butter the bottom and sides of the pans. Then, bake for about 35 to 40 minutes.